Monday, 17 May 2010

Color In CAD, Black and White.


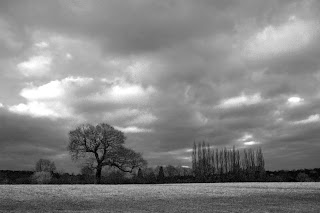
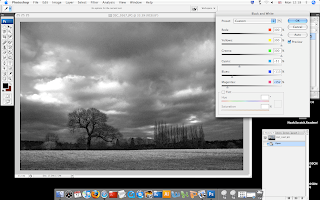
Go to Image> Adjustments> Black & White and you will get the bar that has appeared on the second photograph. Adjust the colors as you want them, I print screened them so you could see what grades I wanted them to be at. This photograph was originally not In black and white, but the sky was a light blue, with white and a very soft pink, I definitely think that In black and white the affect is completely different than in color. In black and white it gives us a monroe feeling, it also looks like an old photograph and you can sense sadness in the black and white one, like there is no hope, but looking at the sky, it looks like something beautiful can happen.

Monday, 10 May 2010

Long Depth of Field.

Believe it or not, I was standing very far away from this abandoned building but the zoom on the Cannon SLR was clearly very good for zooming in but not so much for zooming out. It was on automatic, so the aperture was set on it's own the shutter speed was set to 1/60 second though. I did edit this shot, I made it black & white because I felt it went well with the photograph, everything else is original.

Converting to Black and White using Layers and Hue/Saturation


I had to make sure I had layers selected, I went to Layers> New Adjustment Layer> Hue/Saturation. Then I clicked "Okay" to the new window, the next window I had to open up Hue/Saturation and reduce the Saturation to -100 then clicked "Okay". Then I clicked on Background in Layers palette> Go to Layer on the menu again> New Adjustment Layer> Hue/Saturation> In Mode: "Normal" to "Color" Then i clicked "Okay" In the layers window after I double clicked on the Hue/Saturation icon and in this window I changed the "Master" drop down menu to "Green" And that's how i got the first photograph, by changing the "Master" to "Green" Also when using photoshop I flatten the image so it can be saved as a JPEG and so it won't take up all of my memory.

Using Channels - Converting to Black and White.

This image was taken with a manual camera from our class trip to Kew Gardens. I had to convert a color image using channels to black and white so what i did was go to Layer>New Adjustment layer>Channel Mixer, then click okay>Second window adjust to monochrome> Red 70%> Green 30%> Blue 20%. Afterwards I needed to add a new Hue/Saturation layer, Layer>New Adjustment Layer> Hue/Saturation>Okay. Then I moved the Hue/Saturation layer under the channel mixer.

Thursday, 6 May 2010

Fast Shutter Speed.

A fast shutter speed shot was quite hard to get because of all the moving cars, but this is just my test shot, I will take a better fast shutter speed shot where you can actually see the cars in the picture and isn't so bright. The shutter speed was set to it's most on the Cannon camera i had, which was 1/4000 second and the aperture was F4.5. Before this shot I had taken about three other ones and they came out as white as a ghost, but I will try better next time and hopefully achieve the shot I want.

Short Depth of Field, Shot two.

This is my second short depth of field, very different from my first short depth of field shot but because my long depth of field shots are also trees I wanted my first short depth of field shot to be something else I love. The aperture was set to F.5 and I changed the shutter speed twice, the first time I left it at 1/30 second, but then i decided to change it to 1/60 second. I chose to leave it to 1/60 second, it caught my eye more.

Short Depth of Field.

My first short depth of field shot is this Starbucks cup of cold caffe Mocha,. The aperture was set at F.5 and the shutter speed was set to 1/30 second and I wanted to focus on the drink and not on the background, so I blurred the background. I didn't edit this shot, I left it as it is.

Followers